Sunday, June 16, 2013

Banana Crumb Muffins

I got a job!! While I'm sad I won't be able to be home with my babies anymore I'm so excited for this new opportunity. This job kinda  just fell into my lap. I was at my dentist and thought I should apply there. I mean I have the experience to work as a receptionist at any medical office. So I went online and looked on their website for a careers tab. Sure enough they had one and I emailed the person on the website. Within an hour I got an email asking when I could come in for an interview. I made it for that Thursday. Then when I went in they didn't ask me any questions really except what are you excepting to get paid lol. They were talking like I already had the job. They then set up a second interview with the general manager for the following Tuesday.  I went in and again I wasn't really interviewed she just said this is the job, this is the pay, when can you start! I was like OMG yay!! First of all it's a job and they will be paying me the pay I needed. It is a pay cut from before but that's fine like I said it's what I needed. And second of all it's a job I can do and do well. I'm so excited to get started. I actually got the job back at the end of May but said I couldn't start till this coming Monday. I wanted the extra time to get things done at home with the kids and what not. Oh also now because I'll be working Monday through Friday I only need my mom to watch the kids 3 days a week! My husbands schedule is Wednesday through Sunday so he has Monday and Tuesday off. How great is that?! I'm excited and not nervous or anxious like I was when I first went back when Melody was little. Here is to new opportunities! 

Now that I have a job the blog might take a back seat to everything else that I have going on. I will try to plan a day to do an update so I can keep at it. I did bake a whole lot last week so I have enough for a weekly entry for at least the next 5 weeks. And that is where we will start. Today's recipe is a muffin! I know not a cookie haha! This was one of the first recipes I made from Pinterest. I was in a muffin making mood one day and just baked a ton of them. We always have banana's in the house so I thought lets to banana muffins instead of banana bread. So I went onto Pinterest and found this recipe. It came out so great even my daughter loved them. 

Credit for the recipe goes to: Thrifty Fun

Banana Crumb Muffins

Ingredients:

Muffin:
1 1/2 cups all purpose flour
3 large ripe bananas, mashed
1 tsp. baking soda
3/4 cup sugar
1 tsp. baking powder
1 egg, slightly beaten
1/2 tsp. salt
1/3 cup butter , melted

Topping:
1/3 cup packed brown sugar
1 Tbsp. flour
1/8 tsp. cinnamon
1 Tbsp butter

Directions:

1. Preheat oven to 375 degrees F. In large bowl combine flour, baking soda, sugar, baking powder and salt. 

2. In a separate bowl mix the bananas, egg, and butter. 

3. Stir banana mixture into dry ingredients until just moistened. 


4. Fill muffin cups 2/3 full.

5. Combine the Topping ingredients. Cut in butter until crumbly. Sprinkle over muffins.


6. Bake for 18 to 20 minutes. Cool in pan for 10 minutes.


These are great and only 6 PPVs.

They make a great morning snack and are much better for you than store bought muffins.

I think next time I am going to add chocolate chips to them but I think adding nuts would work too.

Like I said the whole family likes these muffins and I'm sure yours will too!

If you make them let me know how you like that! Thanks!

Amy Sue *^_^*

Sunday, June 9, 2013

Fuller Family Pound Cake

I was going to rant about how I'm feeling kind a bitter this morning but I decided against it. It's a beautiful day out and my kids are being relatively good. I'm hoping we can all get out for a walk today since it is finally not raining. I'm just in a funk because the last two days have been kind bad as far as food goes and I'm kinda beating myself up over it. But I keep remembering how far I've come and how I am never going back there and it gets me through the day. Again the sun is shining so I think a walk outside is what we all need to feel better. 

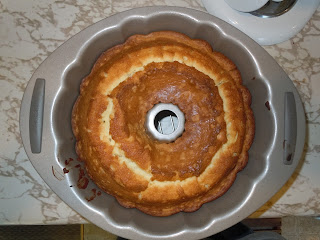
That brings me to today's recipe. I know it's been a while yet again but we have had soooooooo much going on in this family! Anniversary's, birthdays, and weddings, not to mention mothers day as well! So since it's been all about family why not a family recipe? Today's is my mother in laws family pound cake recipe. I remember the first time I had this I was fell in love with it. It's a very simple cake but it's very tasty. You can leave it plain or add a frosting to it. It has a nice brown crust on the outside and the inside is a nice yellow color. It's just overall a great cake.

Fuller Family Pound Cake


Ingredients

2 cups Sugar
1/2 cup vegetable oil
4 Eggs
1 cup milk
1 tsp. vanilla
3 cups Flour, sifted
1 tsp. baking powder

Directions

1. Preheat oven to 350. Grease and flour a bundt pan. In one bowl combined eggs, milk and vanilla.

2. In second bowl add flour and baking powder

3. With a electric mixer fitted with a paddle attachment cream together Sugar and oil.


4. Once you are done creaming the sugar and oil you will start to add the dry and wet ingredients, alternating each one. Beat together on medium speed until all ingredients are mixed together, making sure to scrape the sides of the bowl as you mix.

5. Pour entire mixture into bundt pan and place in the oven for 30 minutes. Once those 30 minutes are up reduce heat to 325 and bake for another hour or so. Use a toothpick to check for doneness. If the toothpick comes out clean the cake is finished.

6. Let cool completely in pan. 


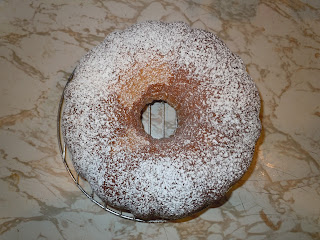
My husband sprinkled powdered sugar on top so that is one option you have once the cake is cool. Another is to make a simple glaze to go on top of it. Just a powdered sugar/milk glaze would work fine.

Now this cake is meant to be shared because it's really not the best for you. It's 7 PPV's if you cut it into 16 pieces. More or less will change the PPV's

Something that goes great with this cake is fruit. Berries, peaches, anything that you can think of. 

Trust me you will get addicted with the first bite. 

There ya go! A family recipe and I think it's a pretty good one. Go ahead and try it and let me know how it turns out!

Amy Sue *^_^*


Friday, May 24, 2013

Banana "Ice Cream"

Well it looks like it's been a while. I'm sorry. The last few weeks have been busy with family parties, job searching and budgeting. I also haven't been baking because first of all it's been warm out and second of all I've been really trying to be good. I'm actually super close to my overall weight loss goal and by super close I mean about 6 pounds away from it. Therefore I've been trying to find healthy ideas for my parties and most of the time they don't always include baking. But then I remembered I did promise to do some other recipies on here besides just cookies or bars. I mean I consider baking anything that has to do with putting ingredients together to make a delicious treat. So onto today's recipe! 

I stumbled upon this recipe on Pinterest one day and thought it would be fun to make up. After all we always have tons of banana's in the house as they are my go to fruit when I'm craving something sweet. But then I looked at the ingredients and there was nothing to it! The one main ingredient you need is Banana's, after that it's up to you! 

Credit for today's recipe goes to: The Not Quite Vegan

Banana "Ice Cream"


Ingredients

3-4 Frozen sliced bananas 
1 Tbsp of Unsweetened cocoa powder
1 Tbsp of peanut butter or peanut butter powder (I used PB2 powder)

Directions

1. In a food processor put in the frozen banana's and turn it on. At first it will look a bit crumbly but as you continue to blend it will start to smooth out. Make sure you stop a few time to scrap the sides of the container .


2. Once the banana's get to a more creamy consistency put in your peanut butter and cocoa powder. Continue to blend until all ingredients are mixed well.

3. Eat right away if you enjoy a frozen yogurt/soft serve type of ice cream or freeze for a few minutes for a more firm ice cream texture.  

I think I made this with 3 banana's and with these 3 I got a pretty big bowlful. You could probably split it between 3 people if you don't want to eat the whole thing.

Now depending on what you put in this treat will depend on the PPV's. If you do not put anything in it then it will be 0 PPV's but if you put in the PB2 powder and cocoa powder it would be 1 PPV. If you use regular peanut butter it would be about 3 PPV's. 

Yes you can add anything you like into this to make it your own. I was thinking of adding strawberries next time to make it a strawberry banana treat. 

I really hope you enjoy this and let me know if you make it!

Amy Sue *^_^*

Wednesday, May 8, 2013

Healthy Chocolate Brownies

Since it's May and super close to summer time it's time to get healthy and stay healthy. First I am doing a few challenges with some of my fit girls on Facebook. I also issued myself a 31 day on track challenge. This is where I will count every single point that goes into my mouth and little to no cheating. So far I've been doing pretty well (with the exception of a few licks of my son's birthday cake icing). I also told my husband that we need to have more fruits and veggies in the house and I want only 3 point and under snacks in the house. If we have ones that are more than that I tend to go way over board. Now as far as exercise goes I am still doing Turbo Fire, which is starting to get more intense. I'm also trying to get my runs in. I am trying to get 3 runs in a week. Mostly just 5k's but it's something. However I think I will have to start doing longer ones because I've beat my times already haha. I mean I can do a 5k in a little under 30 minutes so I think I need to start doing maybe 4 1/2 miles or maybe 5 so this way I can add in some extra time. See it's great to have a plan. 

Speaking of running I did my first official 5k this past weekend. The Color Run came to Rochester on May 4th. I knew it was going to be fun but I didn't know how much until we go there. It was an absolute blast! If you've never done a color run before you run (or walk) a 5k and at each kilometer the volunteers throw this color corn starch on you. Then at the end you have your own packet of color that they give you before the race and they do what they call color throws. About every 15 minutes you throw these packets of color in the air and it looks like one huge color explosion! It was so great! My husband and I did it together and for some one who hates running he even had fun. He wants to do more of them. We both ran the course and guess what? I beat my time for the 5k, 1k and mile! I wasn't even going for speed but it's probably because I was trying to keep up with my husband. I really did have a lot of fun and I can't wait to do it again! Here are a few pictures from the run: 

 Before


During the race


After


So because it's healthy month time it's time for a healthy recipe! Today's recipe was made for my husband for a potluck at work. He wanted me to make something good for you but something that people would like to eat. Why not healthy brownies? Another great Pinterest find. They are made with yogurt and egg whites and they come out super soft and chewy. 

Credit for today's recipe goes to: Recipe.com

Healthy Chocolate Brownies


Ingredients

1 cup granulated sugar
1 container (6 oz) Yoplait® Light very vanilla yogurt
2 tablespoons vegetable oil
2 teaspoons vanilla
2 egg whites
3/4 cups all-purpose flour
1/2 cups unsweetened baking cocoa
1/2 teaspoon salt

Directions

1. Heat oven to 350 degrees F. Spray 8- or 9-inch square pan with cooking spray.

2. In medium bowl, mix granulated sugar, yogurt, oil, vanilla and egg whites. Stir in all remaining ingredients. Spread in pan.


3. Bake 25 to 30 minutes or until toothpick inserted in center comes out clean. Cool completely, about 1 hour. 


I cut these into 16 pieces and that made them 3 PPV's each.

I used a 9 by 9 pan but I think they would of been better in a 8 by 8 pan. In the 9 by 9 they came out kind of thing.

They come out super soft and chewy.

The original recipe called for the Yoplait french vanilla but I wanted to try it with the very vanilla instead. You can tell there is yogurt in these but not in a bad way if that makes any sense. 

Make sure you put them in an airtight container or freeze them after you make them. 

My husband said his coworkers loved them and I know I couldn't put them down myself.

I hope everyone enjoys these and please let me know if you make them!!

Amy Sue *^_^* 


Tuesday, April 30, 2013

Flourless Fudge Cookies

Remember I said back in February that I would rip up that mint? Well about a month ago I did the first initial stages of just that. I pulled up what I could from the dead weed patch on the back porch. It had just rained and it was nice out so I pulled out the hoe and just went at it. I got pretty far too but it was going to take a little more work. Well a few weeks ago I decided to try and get the rest of it done and I think I did pretty good. Most of the dead branches were gone and the dirt was pretty mixed. So I told my husband that I wanted to plant something there instead of just letting it all grow back. He asked me what I wanted to plant and I told him I wouldn't mind doing veggies. So we went to Lowe's and Walmart last night to get what we needed. Then today I finished mixing up the soil and planting the seeds and now I have my own little veggie garden in the back yard. I'm excited and I really hope they grown. I will try my best to keep up with it because what i wouldn't give to have fresh veggies at home. We planted tomatoes, cucumbers, cantaloupe, basil and carrots. It will be interesting to see how things go. The next outdoor project is to set up the nice porch swing my mom got for me as well as add a small patio extension to put the swing on. I love this time of year! 

Since I am trying to be a little more healthy I thought I would post a some what good for you recipe. Flourless Fudge Cookies. There is no flour in these cookies and they are super fudgy and yummy. If you have a chocolate craving reach for one of these. Yes this is another Pinterest recipe and yet again it is another win. Credit goes to: King Arthur Flour

Flourless Fudge Cookies

Ingredients

2 1/4 cups confectioners' sugar
1/4 teaspoon salt
1 cup cocoa powder
3 large egg whites
2 teaspoons gluten-free vanilla extract

Directions

1) Preheat the oven to 350°F. Lightly grease two baking sheets or line with parchment.

2) Stir together all of the ingredients till smooth. Scrape the bottom and sides of the bowl, and stir again till smooth.


3) Drop the soft, batter-like dough onto the prepared baking sheets in 1 1/2" circles; a tablespoon cookie scoop works well here.
\

4) Bake the cookies for 8 minutes; they should spread, become somewhat shiny, and develop faintly crackly tops.

5) Remove the cookies from the oven, and allow them to cool right on the pan.

My daughter tried one tiny bite of them and that was all she wanted. She is one fickle girl lol.

These came out to be about 2 PPV's and the yield was about 24 cookies.

They didn't flatten out as much as I thought they would but I like the way they rounded out. 

These are meant to be eaten right away or within a few days so make them for a special occasion. Our sat around for a few weeks and the last few ones ended up being a little too crumbly and not as chewy.

They were great cookies however and I will be making them again.

As always if you make them please let me know! 

Enjoy!

Amy Sue *^_^*

Tuesday, April 23, 2013

Cake Mix Cookie Bars

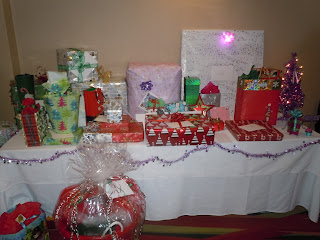
This past weekend was my cousin Julie's Bridal Shower. The theme was Girly Christmas... Yes Christmas. According to my other cousin Emily, her sister, she loves Christmas a lot! So all the decorations were Christmas and they encouraged us to wrap her presents in Christmas wrapping paper. Even the guest book was writing your name on an ornament so she could decorate her tree with it this coming Christmas. Apparently all the bridesmaid along with my Aunt decided on this theme in about October so they were able to get a ton of stuff on sale for the party since it wouldn't be until April. I was so impressed with how wonderful everything looked and how it was presented. Oh and did I mention it was a surprise? Yep Julie had no idea what the theme was. It was great to see her reaction. Here are a few pictures: 

 The Gift Table

 The Guestbook Area

 The Centerpeices

And here is one with me, my sister and my cousins

That leads me to today's recipe. I made these for the shower but because the place they had the shower wouldn't allow food brought in unless by a licensed vendor I just put them in a Christmas cookie container and gave them to my cousin. I decided to make them because Julie follows my Pinterest and I believe she repinned these once I pinned it. These are cake mix cookie bars. Using cake mix for a recipe, espeically a cookie or bar, makes the recipe that much easier. You only need a few ingredients aside from the cake mix itself and most of the time those ingredients are staples that everyone has.

Credit for today's recipe goes to: Parent Pretty

Cake Mix Cookie Bars


Ingredients:

1 Box yellow cake mix
1 Small box instant vanilla pudding
1/4 Cup water
3/4 Cup vegetable oil
2 Eggs
1 Cup chocolate chips

Directions:

1. Preheat your oven to 350 degrees.

2. Combine cake mix, pudding, water, vegetable oil, eggs and chips in large bowl.


3. Pour the batter into a greased 9 x 13 pan.


4. Bake your bars for 25-30 minutes. They are done when the sides start to brown


Depending on how you cut them depends on the yield. I decided to cut these into 36 bars. 

Since I did cut them into the 36 bars they ended up being 3 PPV's each.

I used milk chocolate chips but I would try any kind of chips or even M&M's, like the original poster did. 

These are almost cake like (go figure haha) but do melt in your mouth like a brownie. My husband said they reminded him of a blondie. 

I hope my cousin enjoyed these as well as I hope you did too!

Amy Sue *^_^*